
How to Unblur Photos with AI Without Losing Detail
Learn how to unblur photos with AI, diagnose motion or focus blur, choose a safe editing order, and check for invented detail before downloading.
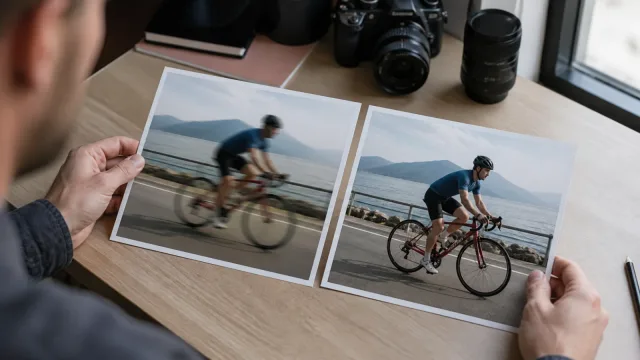
To unblur a photo, first identify whether the problem is camera shake, subject motion, missed focus, low resolution, or compression. Start from the best original file, make one restrained deblurring pass, and compare the result with the source at both 100% zoom and its final viewing size. AI can make modest blur easier to see, but it cannot verify detail that the camera never recorded.
Diagnose the blur before editing
“Blurry” describes an appearance, not a single defect. The correction becomes much more predictable when you first name the cause.
| What you see | Likely cause | Best first response |
|---|---|---|
| Edges trail in one direction | Camera shake or subject motion | Test a deblur pass and inspect the direction of the trail |
| One depth plane is sharp but the subject is soft | Missed focus | Try a restrained AI unblur, with limited expectations |
| The whole frame has doubled or zigzag edges | Camera movement during exposure | Deblur from the cleanest source and check high-contrast edges |
| The photo looks acceptable at native size but blocky when enlarged | Too few pixels or compression | Find a larger source or upscale after cleanup |
| Real edges exist but look slightly weak | Mild softness | Use light sharpening rather than aggressive deblurring |
| Colored speckles or fine grain cover the image | Image noise | Denoise first, then reassess the remaining blur |
Motion blur and missed focus are not identical. Nikon’s photography guidance distinguishes subject movement, camera movement, and out-of-focus areas by looking for sharp parts elsewhere in the frame. It also explains that faster shutter speeds are more likely to freeze movement, while slower speeds record more motion blur. See Nikon’s guides to high-resolution sharpness and shutter speed.
Also decide whether the blur is intentional. A panned background, soft bokeh, flowing water, or a deliberately dreamy portrait can be part of the photograph. Removing it may weaken the image instead of improving it.
Finally, view the file at its native dimensions. A thumbnail stretched across a large monitor will look soft because of size, not necessarily because the original needs deblurring.
Prepare the best source file
Use the least-altered version available: the original camera file, full-size phone photo, or best scan instead of a screenshot or messaging-app copy. Duplicate it and keep the source untouched. For historical, legal, medical, or identity-sensitive material, treat the processed image as a viewing aid and the original as the record.
Define the destination before editing. A profile image and a large print expose different flaws. Choose two or three details that must remain trustworthy—eyes, a logo, a garment seam, a building edge, or real text—and check them after every change.
How to unblur a photo step by step
1. Inspect the photo at normal size and 100% zoom
At normal size, identify what prevents the image from working. At 100%, look for trails, doubled edges, a misplaced focus plane, JPEG blocks, noise, and genuinely sharp areas. This stops you from “repairing” softness caused only by an enlarged preview.
2. Correct the dominant problem first
If grain hides the edges, reduce it mildly first. If the file is tiny, find a larger source before upscaling. If the subject is smeared or defocused but still has structure, test deblurring. The unblur, sharpen, denoise, and upscale comparison helps when symptoms overlap.
3. Process one clean copy
Open the AI image unblur tool for blurry photos and upload the best copy. Use one pass as a candidate. Reprocessing a reconstructed result can magnify halos, false texture, and facial changes.
4. Compare instead of relying on memory
Switch directly between the original and result. Ask whether the subject reads better at the intended size, then check reference points at 100%: hairlines, glasses, fingers, fabric, branches, letters, and high-contrast boundaries.
Adobe recommends 100% view when evaluating sharpening and explains that edge contrast, radius, noise, and blur type affect the result. The same review principles help with AI deblurring. See Adobe’s Smart Sharpen documentation.
5. Reject invented or overprocessed detail
Watch for bright or dark outlines, repeating skin texture, bent straight lines, duplicated eyelashes, altered jewelry, distorted logos, and letters that look crisp but have changed. A plausible reconstruction is not necessarily an accurate reconstruction. If the result changes an identity-bearing or factual detail, keep the original or choose a weaker-looking but more faithful candidate.
6. Save a master and a delivery copy
Save the accepted result as a new master and make a separate delivery copy. Reopen the export in its real browser, app, or layout. If it looks natural there, stop.
Choose the right processing order
The safest order depends on what dominates the image, but this sequence works as a practical starting point:
- Preserve the original.
- Correct major exposure or color problems only enough to judge the subject.
- Reduce disruptive noise before final sharpening.
- Deblur genuine motion or focus softness once.
- Apply light sharpening only if existing edges still need definition.
- Upscale only when the destination requires more pixels.
- Export the delivery copy once and review it.
Sharpening and deblurring are often confused. Adobe describes sharpening as increasing contrast where tones meet and warns that it cannot restore missing detail or correct areas that are truly out of focus. It can help slight softness, but excessive settings produce halos, jagged edges, and stronger noise. See Adobe’s sharpening overview.
If a dark photo is both grainy and blurred, start with a restrained cleanup. Our guide to denoising photos without erasing detail explains how to distinguish noise from fine texture. After denoising, reassess whether blur remains; do not assume every low-light photo needs both operations.
Review portraits, action photos, scans, and text differently
- Portraits: Compare eye shape, mouth, hairline, glasses, jewelry, and skin texture. A clearer face that looks like another person is a failed edit.
- Action photos: Reduce distracting trails without forcing wheels, hands, water, or a panned background into artificial stillness.
- Old scans: Keep the raw scan and separate blur from fading, dust, scratches, and paper texture. Protect faces, dates, insignia, and architecture.
- Text: If characters remain visible, try the AI tool for unblurring text, then verify important words from another source. Generated lettering is not evidence for legal, medical, financial, identification, or safety decisions.
Know when unblurring will not work
Deblurring has a hard limit: it can reorganize or reconstruct visible patterns, but it cannot recover information that was never captured. Expect limited or unreliable results when:
- a face occupies only a few indistinct pixels;
- long motion trails merge several objects together;
- focus missed so severely that no meaningful edge remains;
- text characters overlap or disappear completely;
- an object is hidden, cropped out, or blown to featureless white;
- heavy JPEG compression has replaced edges with blocks and ringing;
- several previous AI or sharpening passes have already altered the file.
Adobe explicitly notes that sharpening cannot restore missing detail or fix out-of-focus areas. AI deblurring may create a more convincing-looking interpretation than conventional sharpening, but appearance does not remove that evidence limit. For archival, journalistic, forensic, or identity-sensitive use, label enhanced versions clearly and retain the untouched source.
Sometimes the right decision is a smaller display, another frame, a new scan, the original file, or a retake. An honest image is better than a sharp result that communicates the wrong fact.
Use a final quality checklist
Before downloading or publishing, confirm all of the following:
- The intended subject is easier to recognize at the final viewing size.
- The result still matches the original expression, shape, text, and object details.
- High-contrast edges do not have bright or dark halos.
- Skin, hair, foliage, fabric, and repeated patterns do not look synthetic.
- Straight lines remain straight and small objects are not duplicated.
- Remaining blur looks natural for the scene rather than abruptly masked.
- Noise has not been sharpened into gritty false detail.
- The original, edited master, and delivery copy are stored separately.
- Important text or identity details have been verified independently.
- The exported file opens correctly in its real destination.
If several versions pass, choose the least aggressive one. The strongest result in a zoomed comparison is often not the most believable result in normal use.
Frequently asked questions
Can AI completely unblur any photo?
No. AI can make mild or moderate motion and focus blur easier to view when the source retains usable patterns. It cannot confirm details that disappeared during capture. Severe blur, tiny subjects, and unreadable text may produce plausible but inaccurate reconstruction.
Should I sharpen or unblur a blurry photo?
Unblur when edges are smeared, doubled, or out of focus. Sharpen when accurate edges already exist but need a small contrast boost. Heavy sharpening on motion trails usually makes them harsher rather than reversing them.
Can an out-of-focus photo be fixed?
A slightly missed focus can sometimes be improved. A severely defocused photo contains too little evidence for a trustworthy recovery. Compare any result around faces, lettering, and other important boundaries, and describe uncertain detail honestly.
Should I denoise before unblurring?
Usually, reduce strong random noise first so it is not interpreted as texture or strengthened later. Keep the pass moderate: excessive denoising can erase the very edges deblurring needs. Compare a second workflow if blur is clearly the dominant problem.
Should I upscale before or after unblurring?
Start from the cleanest source and correct obvious blur before the final enlargement in most everyday workflows. Upscale afterward only to meet a real output size. If the source is extremely small, test both orders and choose the result that preserves recognizable structure.