
How to Colorize a Vintage Photo
Learn how to colorize a vintage photo with restrained, well-documented choices while preserving the original scan as the historical record.
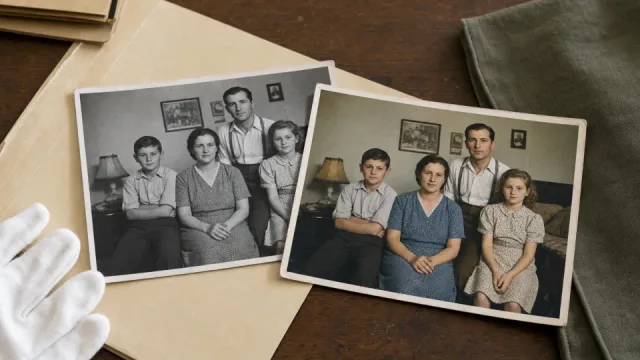
To colorize a vintage photo responsibly, treat every generated color as an interpretation unless independent evidence confirms it. Preserve the scan, label the color version clearly, and use family records or period references to guide any important choices.
How to colorize a vintage photo while preserving the evidence
Treat the original scan as the historical record
Colorization can make a portrait or family scene feel more immediate, but the added colors are not automatically historical facts. Preserve an untouched scan with its borders, notes, and identifying details before you edit a duplicate. This lets future viewers see what was actually captured and compare it with the interpreted version. The original also protects your work if you later learn more about the people, clothing, place, or era shown in the photograph.
Separate documented colors from reasonable guesses
Before you colorize a vintage photo, gather reliable references for anything important: another family image, a uniform guide, a known house color, or a written description. Mark which decisions are supported and which are visual guesses. A neutral or restrained choice is often better than a vivid color that feels certain but lacks evidence. Keeping this distinction visible makes the finished image more honest and more useful to relatives, researchers, and future viewers.
Prepare the scan before judging color
Dust, severe fading, scanner color cast, and deep scratches can confuse both viewers and automated colorization. Work on a duplicate to make the underlying tones readable first, but do not erase meaningful stamps, writing, album edges, or signs of age simply because they look imperfect. Review faces, fabric, foliage, and backgrounds separately after color is added. If an area has no visual or historical evidence, it is acceptable to leave the color understated.
Save an interpretable version with clear context
Name the colorized file so it is visibly different from the archival scan, and add a short note if you used family knowledge, period references, or visual judgment. Keep a full-quality color version plus smaller sharing copies if needed. This documentation is a small step that prevents accidental mislabeling later. It also makes it easy to revisit individual choices when new information appears, without losing the original photograph or the first color interpretation.
Before you start
- Scan the photograph at the best available resolution and store the original scan untouched.
- Gather reliable references for known clothing, uniforms, objects, or places if historical accuracy matters.
- Remove dust, severe fading, or obvious scan issues before evaluating color.
Step-by-step workflow
- Step 1
Prepare a faithful master scan
Make a clean digital copy without trimming away borders, notes, or the back of the photograph if they contain useful history. Keep the original scan in a separate folder and make all restoration or color work on a duplicate.
- Step 2
Separate known details from guesses
List what can be supported by records or other photos and what is unknown. A uniform, house color, or eye color may have a reference; a background wall may not. This distinction helps you describe the finished color version honestly.
- Step 3
Create and review a restrained color version
Colorize a working copy, then review skin, clothing, foliage, sky, and interior surfaces separately. Aim for believable relationships rather than dramatic saturation. If a color feels implausible or conflicts with known evidence, keep it neutral or revisit the reference.
- Step 4
Save both versions with clear labels
Keep the black-and-white scan as the archival reference and save the colorized image as an interpreted version. Include a short note with the project if color decisions were based on family knowledge, documented references, or visual judgment alone.
Check your result
- The original black-and-white scan is preserved unchanged.
- Known historical details agree with available references.
- Colors are restrained enough that the image still feels coherent.
- The colorized copy is labeled as an interpretation where appropriate.
Common mistakes to avoid
- Presenting generated colors as documented historical fact.
- Adding saturation until skin, fabric, and skies look modern or artificial.
- Discarding the unaltered scan after making the color version.
Frequently asked questions
Can I know the original colors in a black-and-white photo?
Only when another source supports them, such as a color photograph, written record, known uniform, object, or direct family knowledge. A black-and-white scan contains tonal information, not a complete record of color. Use references where they exist and describe unsupported choices as interpretations. This is especially important for clothing, skin tones, flags, interiors, and places whose colors could carry personal or historical meaning. Keep the unaltered scan alongside the colorized version.
Should I restore a damaged photo before colorizing it?
A light cleanup on a working copy can make colorization easier to evaluate, especially when dust, fading, or scanner artifacts hide the subject. Keep the archival scan untouched and avoid aggressive repairs that change faces, handwriting, or significant marks. After the image is readable, colorize a duplicate and compare both versions. Restoration and colorization have different goals, so save each stage separately rather than replacing the original with one final-looking file.
Will colorization make an old photo look modern or artificial?
It can if saturation, skin smoothing, or contrast becomes stronger than the original scene supports. A believable result usually uses restrained colors, preserves natural tonal relationships, and leaves uncertain areas modest rather than dramatic. Review the image at normal size, then compare it with the black-and-white scan. If the processing becomes the first thing viewers notice, reduce it. The goal is a thoughtful interpretation, not a glossy contemporary remake.
Can I colorize a vintage photo for family sharing?
Yes, as long as you keep the original scan and label the colorized copy clearly. A color version can be a meaningful way to start conversations with relatives, especially if you include a note about known references and uncertain choices. Share both versions when historical context matters. This gives family members a chance to correct details, contribute memories, and understand which image is the archival record and which one is a contemporary interpretation.
What files should I keep after colorizing a photo?
Keep the untouched scan, a cleaned working copy if you made one, the full-quality colorized version, and any smaller copies for sharing or the web. Add dates and short descriptions to the filenames so each version is identifiable. Store any reference notes with the files when practical. This simple version history protects the photograph, makes later edits reversible, and preserves the reasoning behind color decisions if someone revisits the image years later.
Colorize a photo
Use the photo colorizer on a preserved working copy after you have gathered any references that matter to the image.
Open the toolRelated tutorials
Continue with another practical workflow when your image needs more than one kind of repair or preparation.